


How To Integrate GPT Functions With Bubble (Complete Guide)
29th of June, 2025
GPT functions transform your chatbot from a simple conversational interface into a powerful virtual assistant that can interact with external services. By connecting your ChatGPT model to APIs like Gmail or your own custom services, you can create smarter chatbots that can leverage powerful external databases and tools.
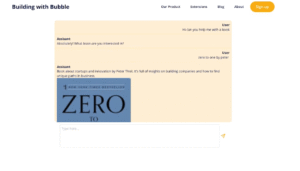
In this comprehensive guide, we’ll build a ChatGPT bot that fetches book information from the Google Books API based on your conversation, demonstrating how to implement GPT functions in your Bubble application.
What are GPT Functions?
GPT functions allow your chatbot to make API calls with parameters extracted from your conversation. Think of it as giving ChatGPT the ability to:
- Send emails through Gmail when you ask it to
- Fetch real-time data from external services
- Perform actions in other applications
In this guide, we’ll connect our GPT model to the Google Books service. After having a conversation with our model, it should then be able to recommend specific books using data retrieved from Google Books.
1. Set Up Your API Infrastructure
Configure OpenAI API Connection
First, you’ll need to set up the OpenAI API in Bubble:
- Install the API Connector plugin from the Bubble plugin store
- Add a new API called OpenAI
- Set authentication to Private key in header
- Add your API key: Bearer YOUR_OPENAI_API_KEY
- You can find your API key by heading to your OpenAI dashboard > API keys > Create a new secret key
- Add a shared header:
- Key: Content-Type
- Value: application/json
Create the Functions-Enabled Completions Call
Now create a specialized API call that supports functions:
- In the API Connector, add a new call named completions_functions
- Set method to POST
- Set endpoint: https://api.openai.com/v1/chat/completions
- Configure as Action (not Data)
2. Structure Your Function Schema
Understanding the Function Format
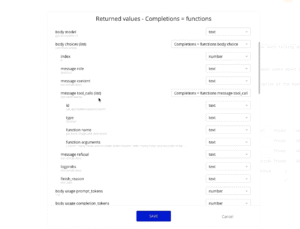
Functions require specific formatting in your API call. Here’s the basic structure to use for defining our function to retrieve the user’s specified book.
{

  "tools": [{

    "type": "function",

    "function": {

      "name": "get_book_image_and_description",

      "description": "Called when the user wants book information",

      "parameters": {

        "type": "object",

        "properties": {

          "name": {"type": "string", "description": "Name of the book"},

          "info": {"type": "string", "description": "Book description"}

        },

        "required": ["name", "info"]

      }

    }

  }]

}
The response after sending a call with the function described above will contain a tool_calls list containing information about what functions were called and what arguments were used.
Set Up Dynamic Fields
In your API call body, make these fields dynamic:
- Add <history> before the messages array for conversation history
- Make the GPT role dynamic: <gpt_content>
- Make the user content dynamic: <user_content>
Configure Function Parameters
For our Google Books example, you’ll need:
- name: The book title extracted from the conversation
- info: A generated description based on context
3. Set Up Google Books API
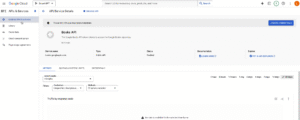
Enable Google Books API
- Go to Google Cloud Console
- Create a new project
- Search for Google Books API and enable it
- Create credentials and get your API key
Create Google Books API Call in Bubble
- Add another API in the API Connector called Google
- Add a call named get_book
- Set the following endpoint: https://www.googleapis.com/books/v1/volumes?q=[book_name]&key=YOUR_API_KEY
- Click Initialize call to receive an initial response.
- Replace spaces with + signs using find/replace operator
4. Build the Chat Interface
Database Structure
Create a Message data type with fields:
- content (text) – The message text
- json (text) – Stores message in JSON format
- user (User) – Empty for AI messages
- image (image) – For book covers
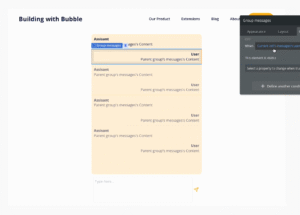
UI Components
Build your chat interface with:
- Repeating group displaying messages
- Conditional visibility for user vs AI messages
- Multiline input for user messages
- Send button to trigger workflows
5. Create the Core Workflows
Main Message Workflow
When the send button is clicked:
Step 1: Create User Message
Create new Message:
- content = Multiline Input’s value
- json = Format as JSON with user role. Set the content field as the value from the multiline input element.
- user = Current User
Step 2: API Call – Completions with Functions
Make another API call with the following values:
- history = All previous messages’ JSON
- gpt_content = Last AI message
- user_content = Multiline Input’s value
Step 3: API Call Response
Make another message with the following values:
- content = set to the result of the previous step’s message content
- json = Format as JSON with user role. Set the content field as the value from the multiline input element.
- user = set to blank
At this point, we’ll now have a chat interface set up with memory functionality.
Function Execution Workflow
When a function is called:
Steps 4 and 5: Extract Parameters
We’ll use the Read JSON plugin’s action “Read JSON and get value by key”.
JSON = Step 2’s results tool_calls:function:arguments:last_item
Key = “name” (for book title)
Next, we’ll create a similar step where:
Key = “info” (for book description)
Step 6: Call Google Books API
Next, we’ll use the get_book call to make an actual call to the Google Books API
For the book_name parameter, we’ll use the extracted name from Step 4.
Step 7: Create Response Message
Create new Message:
- content = Extracted info parameter
- image = Google Books API result’s thumbnail
- user = Empty (AI message)
Step 8: Reset input field
We’ll just need to add a reset action to clear out the input after sending:
To do this, we’ll choose the action “Reset relevant inputs”.
Conditional Logic
Lastly, we’ll also need to add some conditional logic to our workflow.
- When our message does not require a function call, we don’t want to call the Google Books API anymore.
- We can check this by looking at the result of step 2. If the number of characters in the tool_call’s list is not 0, only then should we proceed with Steps 4 onwards.
- On the other hand, we also want to handle the reverse case. If no functions are detected, we’ll proceed with adding a message in step 3 of our workflow.
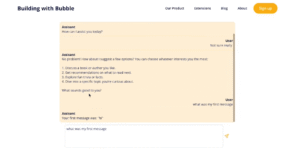
Once you’ve finalized this workflow, you can test your app and try using the chatbot to retrieve book information.
Conclusion
GPT functions open up endless possibilities for creating intelligent, action-oriented chatbots in Bubble. By following this guide, you’ve learned how to create a chatbot that can intelligently interact with external APIs based on natural conversation.
If you’re interested in using other APIs in your Bubble app, you can read our guide on how to use ChatGPT to connect any API with Bubble.io!
Want to start your own Bubble app, check out our complete beginner’s guide crash course! If you want to try out integrating AI into your existing Bubble app, you’ll learn everything you need to know with our Bubble x OpenAI course.