


How to Build a Flashcard Generator in Bubble.io
4th of June, 2025
Creating flashcards manually can be time-consuming and tedious. By leveraging AI and no-code, we can automate this process and generate high-quality learning materials in seconds. In this tutorial, I’ll walk you through building a flashcard generator application in Bubble.io that uses OpenAI’s API to automatically create study cards from any text.
Throughout this guide you’ll learn how to:
Why Build a Flashcard Generator?
Flashcards are one of the most effective study tools for memorization and knowledge retention. With this application, users can simply paste lecture material, articles, or any educational content into a text box, and the app will automatically generate a set of well-formatted flashcards. Each card features a question on the front and its corresponding answer on the back, making it perfect for effective study sessions.
1. Design the Application Interface
Let’s start by creating a clean, user-friendly interface for our flashcard generator app.
Create the Content Input Area
First, we’ll create a space where users can input their study material:
- Create a new page in your Bubble.io editor
- Add a Group element to your page and format it as a column to make it responsive
- Uncheck the following options:
- Make this element fixed-width
- Fit width to content
- Fit height to content
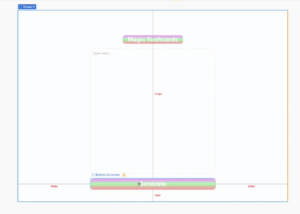
- Add a text element for the title – “Magic Flash Cards”
- Style the title with a gradient background:
- Text color: White
- Border radius: 10px
- Add a Multi-line Input element below the title with:
- 20px margin on top
- Fixed width: 500px
- Fixed height: 500px
- Add a Button element below the input:
- 20px margin on top
- Fixed width: 500px
- Label: “Generate”
- Apply a matching gradient background style
- Border radius: 10px
Create the Flashcard Display Area
Next, we’ll create a new section to display the generated flashcards:
- Drag a Repeating Group element into your page. This element should be next to the group containing our input elements.
- Center the repeating group and add 20px margins on the left and right
- Set a fixed width of 500px and height of 800px
- Inside the row, add a Repeating Group element
- Name the repeating group “Flash Cards”
- Uncheck the “Set fixed number of rows” option
- Set the background to a light gray (1-2% black)
- Remove borders and separators
Create the Flashcard Template
Now we’ll design how each individual flashcard will look:
- Inside the repeating group, add a Group element
- Center it horizontally and vertically
- Set a fixed width and height of 300px
- Name this group “Card”
- Set the border radius to 10px
- Set the background color to white
- Add a Text element inside the card group
- Center-align the text
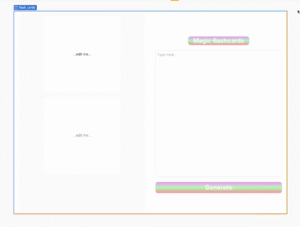
Your interface is now complete!
2. Connect to the OpenAI API
To generate our flashcards, we’ll need to connect our Bubble app to the OpenAI API.
Here’s how to set this up:
Set Up API Authentication
- Install the API Connector plugin if you haven’t already done so.
- Create a new API named “OpenAI Flashcards”
- Set the authentication type to “Private key in header”
- For the API’s private key, enter “Bearer ” followed by the secret key of of your OpenAI account.
- Add the following shared header:
- Key: “Content-Type”, Value: “application/json”
Now that we’ve added all the important details we need to make a call to our OpenAI accounts API service, the next step would be
Create the API Call
- Create a new API call named “Get Flashcards JSON”
- Set it as an “Action” (not “Data”)
- Set the method to “POST”
- Use the endpoint: “https://api.openai.com/v1/chat/completions”
- For the body, use the following JSON structure:
{
“model”: “gpt-4o”,
“messages”: [
{
“role”: “system”,
“content”: <GPT_content>
},
{
“role”: “user”,
“content”: <lecture_material>
}
],
“response_format”: {“type”: “json_object”}
}
The GPT_content value should be an instruction to the system of what to do with the lecture material. For example, we can use the following prompt:
You are a flashcard-making assistant. Please respond in a valid JSON format with the following parameters front and then back for each flash card.
3. Set Up the Backend Workflow
Since Bubble.io needs help recognizing and formatting JSON responses from external APIs, we’ll need to create a new backend workflow to handle this.
Create an API Workflow
- Go to “Backend Workflows” and add a new API workflow
- Name it “Flash_json”
- Add a parameter named “input” with type “text”
- Set it to return data from API with content type “application/json”
- The returned data should be the input parameter set up in step 3.
Create an Internal API Call
We’ll head back to our API Connector menu to create a new API.
- Create another API in the API Connector named “My Application”
- In your Bubble settings, generate a new API token. Keep this private key for the next step.
- Add the following headers:
- Key: “Content-Type”, Value: “application/json”
- Key: “Authorization”, Value: “Bearer YOUR_BUBBLE_API_KEY”
- For this API, create an API call named “Trigger_Backend”
- Set it as “Data” (not “Action”)
- Copy the Workflow API root URL of your application (which you can find in the API tab in Settings) and use it as the endpoint for the API call.
- Set the method to “POST”
- For the body, use the following value: {“input”: “<input>”}
- Set up a new key called “input”.
Later, we’ll be converting the input key into a dynamic value that will parse the OpenAI API’s response.
4. Set Up the Flashcard Functionality
Now, let’s set up our repeating group to retrieve our flash card content:
- Select the flash cards repeating group and set the type of content to “Trigger_backend”
- Set the data source to “RepeatingGroup – flash card’s list of trigger_backends
- Select the “Card” group and set the following
- Set the type of content to “Trigger_backend”
- Set the data source to “Current cell’s Trigger backend choices”
- Select the text element within the card group and set the following:
- Set the text data source to “Parent group’s Trigger backend’s front”
- Set the repeating group flash cards to collapse when hidden and deselect the option to make the element visible on page load.
- Set a condition where the repeating group is only visible if the group’s list of trigger_backends has a count greater than 0.
Add Workflow for Generate Button
Next, we’ll need to add a workflow to handle generating the flashcards themselves.
- Select the Generate button and click Add workflow.
- When the button is clicked, it should trigger the action Get flashcards json.
- Set the action to use the value in the multiline input field as the value of the lecture_material key. Format the value as JSON-safe to prevent errors parsing the material.
- For step 2, set the workflow to display the list in our repeating group flash cards.
- Set the element as the flashcards repeating group
- Set the data source as “Get data from an external API” then select the trigger_backend API call.
- The input should be Step 1’s choices’ message content (for each item)
Create a Custom State
- Select the “Card” group in your repeating group
- Add a custom state named “front” of type “yes/no”
- Set the default value to “yes”
- Add a condition to the Card group: When the Card’s front state is “no”, change the background color to light blue (10%)
- Add a condition to the Text element:
- When Card’s front state is “yes”, display the current cell’s trigger backend flashcard front
- When Card’s front state is “no”, display the current cell’s trigger backend flashcard back
Create the Card Flipping Workflow
Lastly, we’ll need to create one more workflow for when the user clicks on a card:
- Add a workflow to the Card group when it’s clicked:
- If the Card’s front state is “yes”, set it to “no”
- If the Card’s front state is “no”, set it to “yes”
Conclusion
You now have a fully functional flashcard generator application! Users can paste any text content into the application, click generate, and instantly receive a set of interactive flashcards they can study with.
If you want to learn more about using Bubble and AI together, check out our guide on how to create a fine-tuned custom chatbot with Bubble.