


Creating A Custom OpenAI Chatbot With No-Code Using Bubble
2nd of May, 2025
Creating a personalized help center for your Bubble application can significantly improve user experience and reduce support requests. By setting up fine-tuned AI models, you can provide accurate, tailored responses to your users’ questions about your specific product.
In this guide, we’ll walk through how to create a custom ChatGPT model that answers questions about your application with precise, relevant information. We’ll cover building the app’s interface, setting up the OpenAI API calls your app will need to send out, creating the training data for fine-tuning, and implementing the workflow in Bubble.
Throughout this guide you’ll learn how to:
Why Fine-Tune a Model?
Standard AI models provide generic responses that aren’t specific to your application. If you were to ask the standard GPT model “Can I add new team members?”, it responds with a general answer:
“It typically depends on the platform you’re using…”
However, with a fine-tuned model trained on your application’s specific use case or features, the response can be more targeted and helpful:
“Yes, you can add new team members. Go to the team or members section on your account settings…”
By fine-tuning your AI model with relevant data, you can provide a chatbot experience that can actually address user concerns and provide accurate information about your specific application.
Build the Interface
Let’s start by creating a simple interface for the help center. We’ll start with a new blank page.
Add a title to your page
- Create a basic text element at the top of the page.
- Name it “Help Page”.
- Set the font size to 30px and make it bold, and apply the brand colors.
Create the input area for the user query
- In the UI Builder, search for the Input element and drag it into your page. Align the element to the center of the page.
- Next, scroll up to the Visual Elements group of the UI Builder and drag a Button element to your page.
- Group these elements in a row container (select both while holding shift, right-click, and select “Group elements in a row container”).
- Center the container on the page by adjusting the horizontal alignment.
- Click the “Next” option to change the position of the submit button to the right of the input area. For this example, let’s name the button “Ask”.
- Set a placeholder text for the input area like “Ask a help question…”.
Add a response area
Next, we’ll need a text element to display our chatbot’s response. Here’s how we’ll set up a response area:
- Create a text element below the input.
- Adjust the horizontal alignment to center it on the page.
- Set its maximum width to 50% of the page.
- Toggle off the “Fit width to content”.
- Center align the text as well.

This text element will display the payload from the OpenAI API call. To facilitate this, you’ll need to create a new custom state for the current page.
Set up a custom state
- Click on the page and select the icon that looks like “i”. This will open up the Element inspector menu.
- Create a new custom state called “Answer” with the type “Text”.
- Connect the text element to display this custom state by using dynamic data. Set the dynamic data to be Index’s Answer (where “Index” is the name of the current page).
- In the Layout tab, uncheck the option “This element is visible on page load”.
- Set visibility conditions so the text only appears when the page’s Answer state is not empty.

Connect to the OpenAI API
Now let’s set up the connections to OpenAI’s API:
Get your OpenAI API key
- Head to OpenAI’s website and navigate to the Dashboard screen to retrieve your API keys.
- Create a new API key by clicking “Create new secret key”. You should provide a relevant name for your API key for future reference.
- Copy the key (Note: you won’t be able to see it again, so save this key somewhere safe).
Set up API authentication
The API Connector is Bubble’s native integration tool that enables your application to communicate with external JSON-based RESTful web services. This plugin allows users to incorporate external data retrieval or submit information to third-party services by making API calls directly from your Bubble application.
First, install the API Connector plugin if you haven’t already done so.
You can do this through the following steps:
- Navigate to the Plugins section of the Bubble editor and click Add plugin.
- Search for API Connector.
- Click the Install button.
Once the API Connector plugin is installed, we’ll use the plugin to set up multiple OpenAI calls:
- In the API Connector menu, click “Add another API” and set the API Name to OpenAI.
- Set authorization type to “Private key in header”
- Add “Authorization” as the key
- Add “Bearer YOUR_OPENAI_API_KEY” as the value (replace with your actual API key)
- Add a shared header with “Content-Type” as the key and “application/json” as the value
We’ve now set up the authorization required to call our OpenAI API from our Bubble application.
Create Your Training Data
To train your model effectively, you’ll need to create a training file in JSONL format.
Understand the format
The best way to understand the best practices for preparing your dataset for fine-tuning is to use the official OpenAI docs.
- Each line represents a complete example (question-answer pair)
- Format includes system role (instructions), user role (the question), and assistant role (the answer)
Example format:
{"messages": [{"role": "system", "content": "Marv is a factual chatbot that is also sarcastic."}, {"role": "user", "content": "What's the capital of France?"}, {"role": "assistant", "content": "Paris, as if everyone doesn't know that already."}]}
{"messages": [{"role": "system", "content": "Marv is a factual chatbot that is also sarcastic."}, {"role": "user", "content": "Who wrote 'Romeo and Juliet'?"}, {"role": "assistant", "content": "Oh, just some guy named William Shakespeare. Ever heard of him?"}]
To generate examples, ChatGPT can be useful to help create training data. You can use existing wikis, documentation, support tickets to help ChatGPT generate examples. The OpenAI documentation recommends at least 50 to 100 examples for good results when fine-tuning.

Next, save the training data as a plain text file. You can copy the results from ChatGPT into a plain-text editor. You must save the file with a .txt extension. (e.g., “training_file.txt”).

Set Up API Calls
Your application will need to make several API calls to implement a fine-tuned model.
- For Uploading the Training Data
- For Starting the Fine-tuning Job
- For Using the Fine-tuned Model for Chat Completion
File Upload API Call
This uploads your training file to OpenAI:
- Go to OpenAI’s API reference for file upload. Copy the provided cURL code.
- Import the curl code into Bubble. To do this, click on the Import another call from cURL option in the OpenAI API menu we’ve set up in the previous step.
- Paste the cURL snippet and click Import. Bubble will automatically fill out details for the API call. However, we’ll need to make a few edits.
- We can delete the headers since they’ve already been specified earlier.
- Set the name of the call to “file_upload” for clarity
- Set it as an “Action” (not “Data”)
- Change Body type to “Form-data” which will allow us to add parameters.
- Add the following parameters:
- “purpose” with value “fine-tune”
- “file” and enable the “Send file” option (uncheck the Private option here as well). This changes the Value field to an Upload button.
- Upload your training file by clicking Upload.
- Click Initialize call.
- Save the file ID from the response for the next step.
Fine-Tuning Job API Call
Now that OpenAI has our training data, we can perform another API call to start a new fine-tuning job.
Here’s how to do this through Bubble’s API Connector:
- Go to OpenAI’s API reference for creating a fine-tuning job
- Import the cURL code into Bubble.
- Name the call “fine_tune_job”
- Set it as an “action”
- Add the following dynamic parameters:
- “model” with the base model of your choosing (e.g., “gpt-3.5-turbo-0125”)
- “training_file” with the file ID from the previous step.
- Save the fine-tuning job ID from the response.
Chat Completion API Call
This API call will allow you to finally use your fine-tuned model:
- Go to OpenAI’s API reference for Chat Completion.
- Import the cURL code into Bubble.
- Name the call “Completions”
- Set the call as an “action”
- Add the following dynamic parameters:
- “model” with your fine-tuned model ID
- “messages” with the user’s question
- Test API call with sample values.
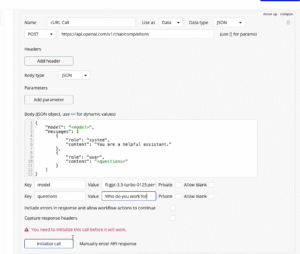
For example, we can test the API by setting the questions parameter to “Who do you work for” and clicking Initialize call.

Bubble will return the API’s response. You can view the model’s reply under the message content field.
Implement the Workflow
Now let’s connect everything to make it work in Bubble:
- Create a workflow triggered by the “Ask” button. In the Design tab, click on the Ask button and click the Edit workflow option on the button’s panel.
- By default, the button will have an event called “When Button Ask is clicked”. Create a new action for this event by selecting Plugins > OpenAI Chat Help.
- Call the “Completions” API with:
- Model: Your fine-tuned model ID
- Question: The value from the input field. This will be a dynamic data value.
- Add another action following the first step. This next action should be the action “Set state of an element”.
- Set the page’s “answer” state to the response from the API call.
- To retrieve the response, use the path: “Result of step 1 (OpenAI – Chat Help)’s choices: each item’s message content: first item”

Test Your Fine-Tuned Model
You can now test your fine-tuned model:
- Ask a question that would be in your training data.
- Compare the response to what a standard model would provide.
- Verify that the answers are specific to your application.

Conclusion
By fine-tuning a custom GPT model with your application’s specific information, you can create a powerful, personalized help center that provides accurate responses to user questions. This approach not only improves user experience but also reduces the support burden on your team.
If you’re interested in using other APIs in your Bubble app, you can read our guide on how to use ChatGPT to connect any API with Bubble.io!