


How to Integrate SendGrid with Bubble (Complete Guide)
26th of September, 2025
Integrating SendGrid with your Bubble application enables you to send automated emails dynamically without complex coding. This integration is essential for apps requiring email notifications, user communication, or audience engagement features.
In this comprehensive guide, you’ll learn how to set up SendGrid, authenticate your domain, configure API keys, and create Bubble workflows to send professional emails directly from your application with reliable deliverability.
1 – Initial Account Setup
Before building email templates or workflows, you need to complete three essential setup steps in SendGrid: verify your sender identity, authenticate your domain through DNS settings, and create an API key to connect SendGrid with Bubble.
Prerequisites
You’ll need the following items set up before starting this integration:
- A custom domain (purchased through any domain provider like GoDaddy, VentraIP, or similar services)
- An email address using your custom domain(we’ll use Gmail for this example)
- A Twilio SendGrid account (which is free to create at their official website)
2 – Verify Your Sender Identity
SendGrid requires sender verification to comply with anti-spam laws and ensure email deliverability.
Create Your Sender Identity
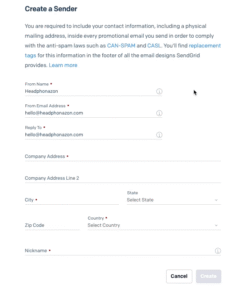
Navigate to the Settings section in your SendGrid dashboard and locate the sender authentication area. You can also access this through the welcome section on your dashboard.
- Click Create Sender Identity to open the sender authentication screen
- Fill in your sender information:
- From name: Your app or business name (e.g., “Headphone Zone”)
- From Email address: The email address you want to send from (e.g., hello@headphonezone.com)
- Reply to email: Typically the same as your From Email Address
- Complete the required address details for anti-spam compliance
- Click Create to generate your sender identity
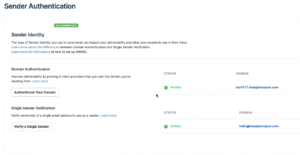
Verify Your Email Address
After creating your sender identity, SendGrid will send a verification email to your specified address.
- Check your email inbox for the SendGrid verification message
- Click Verify in the email
- Return to SendGrid to confirm the verification was successful

You should see “Verified: Yes” status in your sender authentication section.
3 – Authenticate Your Domain
Domain authentication prevents emails from appearing as sent “on behalf of” SendGrid or Twilio, ensuring they appear to come directly from your verified domain.
Configure DNS Settings
Without domain authentication, recipients would see emails from your address but with a note indicating they’re sent through SendGrid’s domain. Domain authentication eliminates this issue.
- In the Sender Authentication section, click Get Started for domain authentication
- Select your domain provider (or choose “Other” if not listed)
- Choose Yes to brand links with your domain, then click Next
- Enter your domain name (e.g., headphonezone.com) in the From Domain field
- Click Next to generate DNS records
Add DNS Records to Your Domain Provider
SendGrid will provide specific DNS records that you must add to your domain’s DNS settings:
- Copy each CNAME record’s host and value
- Navigate to your domain provider’s DNS management section
- Add all provided CNAME records exactly as specified
- Add the TXT record with its corresponding value
- Save all DNS changes
Note: DNS changes can take several minutes to propagate.
Return to SendGrid and click Verify to confirm your DNS records are properly configured. You should receive a success message indicating your domain has been authenticated.
4 – Create an API Key for Bubble Integration
API keys provide secure authentication between SendGrid and your Bubble application, ensuring only authorized requests can send emails through your account.
Generate Your API Key
- Navigate to the API Keys section in SendGrid
- Click Create API Key
- Select Full Access permissions
- Name your API key (e.g., “Headphone Zone Email”)
- Click Create and View
Important: Copy the API key immediately as it will only be displayed once. Store it securely as you’ll need it for the Bubble integration.
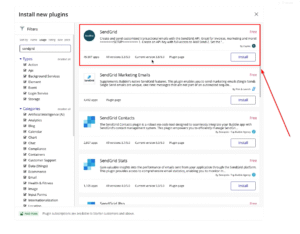
5 – Install the SendGrid Plugin in Bubble
Add the Plugin
- Open your Bubble application editor
- Navigate to the Plugins tab
- Click Add plugins and search for “SendGrid”
- Install the SendGrid plugin by CoPilot (a trusted provider with pre-built functionality)
Configure API Authentication
- Scroll to the API Key section in the plugin settings
- Paste your SendGrid API key in both the Development and Live fields
- The Development field allows testing in your development environment
- Save the plugin configuration
The plugin automatically provides workflow actions, including the essential Send Grid – Send email action for your workflows.
6 – Create a Dynamic Email Template in SendGrid
Dynamic templates allow you to send personalized emails using data from your Bubble application through substitution tags.
Build Your Template
- Navigate to Email API > Dynamic Templates in SendGrid
- Click Create a Dynamic Template and name it (e.g., “Headphone Zone Email”)
- Click Add Version to create your first template version
- Choose Blank Template and select the Design Editor
Design Your Email Layout
SendGrid’s drag-and-drop editor makes template creation straightforward:
- Add branding: In the Build panel, drag an Image element to the top of your template and upload your logo or header image
- Create content structure: Add a Text element for your email body
- Write a sample base message (e.g., “You’ve received a new submission. Check it out below.”)
Implement Substitution Tags
Substitution tags allow dynamic content insertion from your Bubble workflows. Create tags using curly brackets with unique identifiers:
- Name tag: Add {name} where you want the sender’s name to appear
- Email tag: Add {email} for the reply-to email address
- Message tag: Add {message} for the email body content
- Subject tag: Add {subject-line} in both the subject line and preheader fields
Technical note: Use two curly brackets {{tag}} for plain text substitution, or three curly brackets {{{tag}}} for HTML/rich text content that preserves formatting.
Configure Subject Line and Preheader
- Subject line: Use {subject-line} to make it dynamic
- Preheader: Use {message} or another relevant substitution tag
The preheader appears as gray preview text in email inboxes.
Set Up Unsubscribe Compliance
To comply with anti-spam regulations:
- Navigate to Suppressions > Global Unsubscribes
- Create an unsubscribe group (e.g., “Unsubscription”)
- Note the Group ID number for use in your Bubble workflow
- This ensures proper unsubscribe handling for email compliance
Save your completed template and copy the Template ID for use in Bubble.

7 – Create the Bubble Workflow
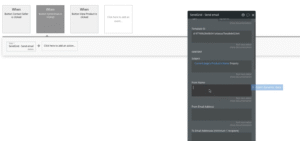
Set Up the Workflow Trigger
- Navigate to your contact form or email trigger element in Bubble
- Add a new workflow triggered by your Send Email button click
- Add the Send Grid – Send email action from your installed plugin
Configure Email Parameters
Fill in the workflow action fields with both static and dynamic data:
Basic Settings:
- Template ID: Paste your SendGrid template ID
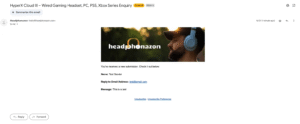
- Subject: Use dynamic data like “Current page’s Product’s name” followed by “Inquiry”
- From name: Your business name (e.g., “Headphone Zone”)
- From email: Your verified sender email (e.g., hello@headphonezone.com)
Recipient Settings:
- To email: Dynamic data pointing to the recipient (e.g., “Current page’s Product’s sold by email”)
- Reply to email: Dynamic data from your form’s email input field
- Blind copy: Optionally add your own email to receive copies
Configure Substitution Tags
Map your form data to SendGrid substitution tags using key-value pairs:
- name: Map to your form’s name input field value
- email: Map to your form’s email input field value
- message: Map to your form’s message/textarea input field value
- subject-line: Map to your dynamic subject line content
Important: Ensure substitution tag names exactly match those used in your SendGrid template.
Add Unsubscribe Group (Optional)
If you created an unsubscribe group in SendGrid, add the Group ID to the Unsubscribe Group field in your workflow action.
8 – Test Your Integration
Create Test Data
- Set up a test user with an email address you control
- Create a test product or listing to generate email content
- Use your contact form to send a test email
Verify Email Delivery
- Complete your contact form with test information
- Submit the form to trigger the workflow
- Check the recipient email inbox for the properly formatted message
- Verify that all substitution tags populated correctly with your test data
Validate Email Formatting
Confirm your test email includes:
- Proper branding header
- Dynamic content in all substitution tag locations
- Correct sender information
- Working reply-to functionality
- Professional appearance matching your template design
Conclusion
You now have a fully functional SendGrid and Bubble integration that enables dynamic email sending from your application. This setup provides reliable email deliverability without requiring complex coding, using only API configurations and workflow actions.
If you want to learn more about using third-party APIs with Bubble, don’t miss out on our guide on how to integrate Stripe payments with your Bubble application.