


How To Reveal A Password Inside An Input Field (Complete Bubble.io Guide)
3rd of September, 2025
Creating a show/hide password toggle feature significantly improves user experience on login and signup pages. Instead of forcing users to delete and retype passwords when they suspect an error, this feature allows them to quickly verify their input with a simple click. This guide will walk you through implementing this functionality in Bubble, including the necessary design elements, plugin setup, and workflows.
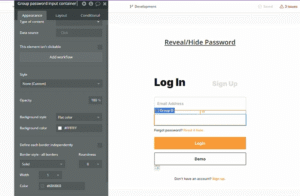
1 – Set Up Your Design Elements
Create the Container Group
First, you’ll need to build a container that will hold both your password input and the toggle icon.
- Navigate to the Design tab in your Bubble editor
- From the left panel, drag a Group element onto your page
- Position it below your email input field (if you have one)
- Add 15px top margin for proper spacing
- Apply a border with 30% gray color for visual definition
- Rename the group to “Group Password Input Container” for better organization
Add the Password Input Field
Next, you’ll need to add the actual password input element inside your container group.
- Drag an Input element from the left panel into your container group
- Name it “Input Password 1” (using a unique identifier helps with targeting)
- Remove the border from the input’s appearance settings for a cleaner look
- Uncheck the fixed width option to allow the input to be responsive
- In the ID Attribute field, insert “Password1” or your desired identifier for this element.
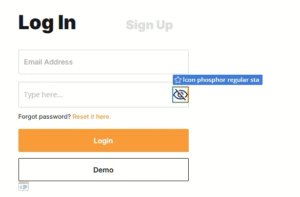
Insert the Toggle Icon
This toggle icon will serve as the button users click to reveal or hide their password.
- Add an Icon element to your container group
- Change the container group’s layout from Column to Row to position elements horizontally
- Move the icon to the right side of the input
- Update the icon’s color to a darker blue (or your preferred color)
- In the Appearance tab, select the eye-slash icon to represent the default state of the toggle icon.
2 – Configure Bubble Settings and Install the Plugin
Enable HTML ID Attributes
Before proceeding, you need to enable a specific Bubble setting that allows you to add ID attributes to elements.
- Go to Settings in the left sidebar and navigate to the General tab
- Toggle on the option labeled “Expose the option to add an ID attribute to HTML elements”
Install the Reveal/Hide Password Plugin
You’ll need a specialized plugin to handle the password visibility toggle functionality.
- Navigate to the Plugins tab in the left sidebar
- Click “Add plugins”
- Search for the “Reveal & Hide Password” plugin and install. You may also find the plugin through their official Bubble plugin page.
- Once installed, drag the Reveal element from the plugin onto your page (it won’t be visible to users)
3 – Set Up States and Functionality
Create a Custom State
States allow you to track whether the password is currently hidden or visible.
- Select your container group
- Click on the “i” info icon to access element properties
- Select “Add a new custom state”
- Name the state “Hidden”
- Set the state type to “yes/no”
- Set the default value of “Hidden” state to “yes” (password is hidden by default)
Assign an ID to Your Password Input
The plugin needs to identify which input field to toggle, which requires setting an HTML ID.
- Select your password input element
- Scroll to the bottom of the Appearance tab
- Find the “ID attribute” field
- Enter “password1” as the ID
- Copy this ID value for use in the workflow
4 – Build the Toggle Workflows
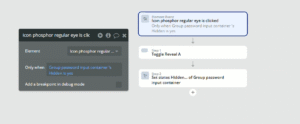
Create the Show Password Workflow
This workflow reveals the password when the user clicks the icon while it’s hidden.
- Select the toggle icon element
- Click “Add workflow”
- When the icon is clicked, we want our plugin to toggle the state. Click the plus icon and select Element Actions > Toggle a Reveal
- Select the Reveal A element and enter “Password1” in the ID field
- Add a “Set state of an element” action:
- Element: Group Password Container
- Custom state: hidden
- Value: no
- Add a condition to the workflow: “Only when Group Password Container’s hidden is yes”
Create the Hide Password Workflow
Duplicate and modify the first workflow to handle hiding the password.
- Copy the show password workflow
- Paste to create a duplicate
- Change the workflow condition to: “Only when Group Password Container’s hidden is no”
- Update the set state value to “yes”
5 – Add Conditional Formatting
Update Icon Based on State
The icon should change to reflect whether the password is visible or hidden.
- Select the toggle icon
- Navigate to the Conditional tab
- Add first condition:
- When: “Group Password Container’s hidden is yes”
- Icon: eye-slash (eye with line through it)
- Add second condition:
- When: “Group Password Container’s hidden is no”
- Icon: eye (open eye)
Conclusion
You’ve now successfully implemented a reveal/hide password feature in your Bubble application. This functionality provides users with a simple yet effective way to verify their password input, reducing frustration and improving the overall user experience on your login and signup pages.
For more Bubble tutorials on improving user authentication experiences, check out our guide on building a password strength indictor!