


How To Build A Referral Program In Bubble.io (2025 Complete Guide)
16th of December, 2025
A referral program is an essential feature for any app that relies on user growth. Whether you’re building a membership-based platform, an e-commerce store, or a marketplace, a well-structured referral system can drive engagement and help scale your user base efficiently.
In this guide, you’ll learn how to generate unique referral links for users and ensure that when new users sign up using those links, the referral is correctly attributed to the referring user. By the end, you’ll have a fully functional referral program that allows users to invite others and track their referrals seamlessly.
1. Set Up the Database Structure
Before building the user interface, you’ll need to modify your database to support the referral system. This involves adding two new fields to the User data type.
Add Referral Fields to the User Data Type
Here’s how to set up your database:
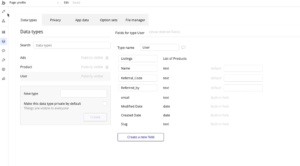
- Navigate to the Data tab in your Bubble editor.
- Select the User data type.
- Create a new field called referral code with the type set to text. This will store the unique string of characters appended to the end of shared URLs.
- Create another field called referred by with the type set to text. This will store the referral code of the user who referred them.
The referral code field stores each user’s unique identifier that they can share with others. The referred by field creates the connection between new signups and the users who referred them.
2. Build the Referral UI Components
With the database configured, you can now create the user interface elements that allow users to generate and share their referral links.
Create the Referral Section Container
Start by adding the main container for the referral section:
- In the Design tab, add a Text element for the heading. Set the text to Referrals, make it bold with a font weight of 700, and set the font size to 24.
- Add 20 pixels of margin on all sides.
- Create a Group element below the heading and name it group referral data.
- Set the background to a flat color with the hex code #EEEEEE.
- Set the border roundness to 20 pixels.
- Add 20 pixels of margin to the left, right, and bottom.
Add the Referral Link Label and Placeholder Text
Inside the referral data group, add elements to guide users:
- Add a Text element with the content Referral Link and make it bold.
- Add 20 pixels of margin to the top, left, and right, and 10 pixels to the bottom.
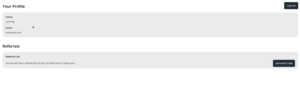
- Add another Text element below with the message: You do not have a referral link just yet. Hit generate to create yours.
- Add 20 pixels of margin to the left and right, and 10 pixels to the bottom.
Configure Conditional Visibility for the Placeholder Text
The placeholder text should only appear when the user hasn’t generated a referral code yet:
- Select the placeholder text element and navigate to the Conditional tab.
- Define a condition: When Current User’s referral code is empty.
- Set This element is visible to yes.
- Check the option to Collapse this element’s height when hidden.
- Uncheck Visible on page load.
3. Create the Generate Code Functionality
Now you’ll add the button that generates unique referral codes for users.
Add the Generate Code Button
- Create a Group with a Row container layout to hold the placeholder text and button side by side.
- Add a Button element with the label Generate Code.
- Add 20 pixels of margin to the left and right, and 10 pixels to the bottom.
- Set the vertical alignment to center.
Build the Generate Code Workflow
When clicked, the button should create a unique referral code:
- Select the button and click Start/Edit workflow.
- Add the action Make changes to thing.
- Set the thing to change to Current User.
- For the referral code field, use the expression: Calculate formula > Generate random string.
- Set the length to 12 characters.
- Enable Use letters and Use numbers.
- Leave Use special characters and Use capital letters unchecked to ensure URL compatibility.
Add Conditional Visibility for the Generate Button
The generate button should only appear when the user doesn’t have a referral code:
- Navigate to the Conditional tab of the button.
- Add the condition: When Current User’s referral code is empty.
- Set This element is visible to yes.
- Check Collapse this element’s height when hidden.
- Uncheck Visible on page load.
4. Display the Referral Link
Once a user generates their code, you’ll need to display their complete referral link.
Create the Referral Link Input Field
Using an input field instead of a text element allows for easier copying functionality:
- Add an Input element and name it input referral link.
- Remove the border styling so it appears as plain text.
- Set the input to Disabled to prevent users from editing it.
- Uncheck the fixed width option.
Configure the Dynamic Referral Link
Set up the initial content to display the complete referral URL:
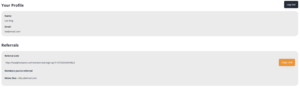
- In the Initial content field, construct the URL using this format: [Your App URL]/signup?r=Current User’s referral code
For example, if your app URL is headphonezone.com, the initial content would be:
Dynamic data: https://headphonezone.com/version-test/signup?r= followed by Insert dynamic data > Current User’s referral code
The question mark (?) in the URL indicates the start of query parameters. The r= serves as the parameter identifier that you’ll reference later when processing signups. This tracking parameter doesn’t affect page navigation—it simply stores data in the URL for tracking purposes.
Add Conditional Visibility for the Referral Link
- Navigate to the Conditional tab.
- Add the condition: When Current User’s referral code is not empty.
- Set This element is visible to yes.
- Check Collapse this element’s height when hidden.
- Uncheck Visible on page load.
- Add 20 pixels of margin to the left.
5. Add Copy to Clipboard Functionality
To make sharing easy, add a button that copies the referral link to the user’s clipboard.
Install the Copy to Clipboard Plugin
- Navigate to the Plugins tab in your Bubble editor.
- Search for Copy to Clipboard (the plugin by Aleram is recommended).
- Click Install.
Create the Copy Link Button
- Add a Button element with the label Copy Link.
- Style it with a different color (such as yellow) to distinguish it from the generate button.
- Set up conditional visibility: When Current User’s referral code is not empty, set This element is visible to yes.
- Check Collapse this element’s height when hidden.
Build the Copy Workflow
- Select the copy button and click Start/Edit workflow.
- Add the action Copy to Clipboard (available after installing the plugin).
- Set the value to copy as Input referral link’s value.
6. Display Referred Members
Create a section to show users who they’ve successfully referred.
Add the Referred Members Heading
- Add a Text element with the content Members You’ve Referred.
- Make it bold and add 20 pixels of margin to the left and right.
- Add 10 pixels of margin to the top and bottom.
Add Placeholder Text for No Referrals
- Add a Text element with the content No members referred just yet.
- Make the text italic to indicate it’s a placeholder.
- Add 20 pixels of margin to the left, right, and bottom.
Create the Referred Members Repeating Group
- Add a Repeating Group and name it repeating group referred members.
- Set the Type of content to User.
- Set the Data source to: Do a search for Users with the constraint referred by = Current User’s referral code.
- Uncheck Set fixed number of rows.
- Remove separators and borders in the Appearance tab.
- In the Layout tab, uncheck fixed width and remove the minimum height.
- Add 20 pixels of margin to the left, right, and bottom.
Design the Member Details Cell
Inside the repeating group:
- Add a Group named group member details with a Row container layout.
- Set the Type of content to User and the Data source to Current cell’s User.
- Add a Text element displaying Parent group’s User’s name (make it bold).
- Add a dash separator.
- Add another Text element displaying Parent group’s User’s email.
- Set the vertical alignment to center.
Configure Conditional Visibility for the Lists
For the placeholder text:
- Add the condition: When Repeating group referred members’s List of Users:count is 0.
- Set This element is visible to yes.
- Check Collapse this element’s height when hidden.
- Uncheck Visible on page load.
For the repeating group:
- Add the condition: When Repeating group referred members’s List of Users:count ≥ 1.
- Set This element is visible to yes.
- Check Collapse this element’s height when hidden.
- Uncheck Visible on page load.
7. Process Referral Codes on Signup
The final step is to capture the referral code from the URL when new users sign up.
Modify the Signup Workflow
Navigate to your signup page and locate the signup button’s workflow:
- Find the existing Make changes to current user action (or add one if it doesn’t exist).
- Add a new field to change: referred by.
- Set the value to: Get data from page URL.
- Set the Type to Parameter.
- Set the Parameter name to r (matching the identifier used in your referral link).
This extracts the referral code from the URL parameter and saves it to the new user’s record, creating the connection between the new signup and the referring user.
Conclusion
You now have a fully functional referral program in your Bubble app. Users can generate unique referral codes, share their personalized links, and track who they’ve referred—all without writing a single line of code.
For more Bubble tutorials on user management and growth features, check out our other guides on Building with Bubble such as our guide on adding Stripe subscription payments .