


How to Create a Pinterest-Style Repeating Group in Bubble.io
16th of September, 2025
A masonry grid layout contains elements of varying heights that fit together seamlessly, similar to how bricks are arranged in masonry work. This layout style is famously used by Pinterest, where images of different dimensions create an organic, flowing visual experience.
In this guide, you’ll learn how to build a masonry grid repeating group in Bubble that displays images in a Pinterest-style layout, where items overlap and intertwine naturally based on their content height.
Throughout this guide you’ll learn how to:
1 – Set Up Your Data Structure
Before building the masonry grid, ensure you have the appropriate data structure in place. For this example, we’ll use an Image data type that contains image files stored in your Bubble database.
Your data type should include:
- An image field to store the actual image files
- Any additional fields for metadata (titles, descriptions, etc.)
2 – Add and Configure the Repeating Group
Create the Basic Repeating Group
Start by adding a new repeating group to your page:
- Navigate to the Design tab in your Bubble editor
- In the UI Builder panel, locate the Containers section
- Drag a Repeating Group onto your page
- Position it with appropriate padding or margin for styling
Enable Masonry Display
The key to creating a masonry grid is found in a specific setting within the repeating group configuration:
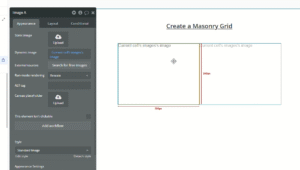
- Select your repeating group
- In the Appearance tab, locate the option Set fixed number of rows and uncheck this option
- Select the option labeled “Display items as a masonry grid”
Next, you can determine how many columns you want in your masonry grid:
- In the repeating group’s Appearance tab, you’ll see options to add columns
- For this example, we’ll add two columns to create a balanced layout
- You can adjust this based on your design needs and screen size
3 – Add and Configure Image Elements
Insert Image Elements
Now add the visual elements that will populate your masonry grid:
- From the Visual Elements section in the UI Builder, drag an Image element into your repeating group
- Ensure the image is properly nested within the repeating group (you should see “Current cell’s…” options when setting dynamic data)
Set Dynamic Data Source
Configure the repeating group to pull data from your database:
- Select the repeating group
- Set the Type of content to your image data type (in this case, Image)
- Set the Data source to Search for Images
Configure Image Display
Set up the individual image element:
- Select the image element within the repeating group
- Set the Dynamic image to Current cell’s Image’s image
- This will display the image from each database record
4 – Fine-Tune Layout Settings
Adjust Repeating Group Dimensions
Configure the overall container dimensions:
- Select the repeating group
- In the Layout tab, set appropriate width constraints. For this example, set Max width to 800px
- Enable Fit width to content to allow the container to expand based on content
Configure Image Settings
Critical settings for proper masonry display:
- Select the image element
- Set Min height to a low value (around 50 pixels)
- This allows images to scale appropriately while maintaining aspect ratios
- In the Run-mode rendering options, ensure it’s set to “Rescale”
These settings ensure that images can expand to their natural dimensions while fitting within the masonry grid structure.
5 – Preview and Test Your Masonry Grid
Click the Preview button to see your masonry grid in action. You should now see:
- Images displayed in a Pinterest-style layout
- Items of different heights fitting together naturally
- No awkward gaps between elements
- A visually appealing, organic flow of content
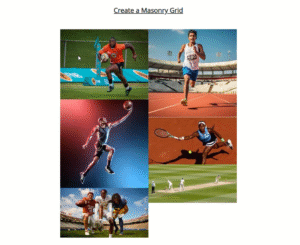
The masonry grid will automatically arrange your images based on their natural dimensions, creating the characteristic interlocking pattern that makes this layout style so popular.
Conclusion
Creating a masonry grid repeating group in Bubble transforms the standard rigid layout into a dynamic, visually appealing display similar to Pinterest. By unchecking the “Set fixed number of rows” option and configuring your images with appropriate scaling settings, you can create professional-looking layouts that adapt naturally to content of varying dimensions.
For more Bubble tutorials on improving the user experience, check out our guide on building overlapping repeating groups in Bubble!