


How To Insert Ads Into Repeating Groups In Bubble.io (Complete Guide)
19th of August, 2025
Are you looking to monetize your Bubble app by including ads or custom content in your users’ feeds? This guide shows you how to display advertisements or promotional content at regular intervals within repeating groups – perfect for social media feeds, news apps, or e-commerce marketplaces.
In this tutorial, you’ll learn how to create a repeating group that displays items from your database with custom ad groups inserted every few cells, creating a seamless feed experience similar to platforms like Instagram or Amazon.
Understand the Repeating Group Architecture
The key to inserting ads into repeating groups is using a parent-child repeating group structure. Instead of one repeating group, you’ll create:
- A parent repeating group that contains both your content cells and ad cells
- A child repeating group within each parent cell that displays a fixed number of items
- An ad group that appears after each set of items
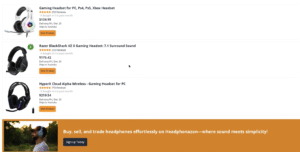
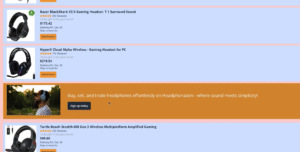
This approach allows you to display, for example, three products followed by an ad, then another three products and another ad, continuing throughout your feed.
1. Set Up Your Database
Before building the repeating group structure, ensure you have:
- Your main content data type (products, posts, articles, etc.) with the necessary fields
- An ads data type containing your advertisement content
For this example, we’ll use:
- A Product data type with image, name, and price fields
- An Ads data type with text, image, and background color fields
If you’re using third-party ad services such as Google AdSense, you can adapt this structure to display those instead of database entries.
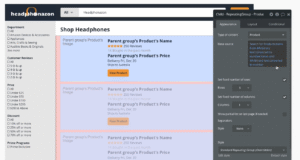
2. Create the Parent Repeating Group
Start by creating the container that will hold both your content and ads.
Add the Parent Repeating Group
- Navigate to the Design tab in your Bubble editor
- From the Containers menu, drag a Repeating Group onto your page
- Name it “Parent Repeating Group”
Configure the Parent Settings
Set up your parent repeating group with these specifications:
- Type of content: Product (or your main content type)
- Data source: Search for Products
- Fixed number of rows: Unchecked
- Separator: None
- Border style: None
- Minimum height: 0
3. Add the Child Repeating Group
The child repeating group will display a fixed number of items within each parent cell.
Create and Position the Child Group
- Add another Repeating Group inside the parent repeating group
- Name it “Child Repeating Group”
- Ensure it’s properly nested within the parent (check your elements tree)
Configure Child Settings
- Type of content: Product
- Fixed number of rows: 3 (or your desired number of items between ads)
- Fit height to content: Checked
4. Set Up the Parent Cell Reference
To properly calculate which items to display in each child group, you need to track the parent cell index. One way to accomplish this is by using a hidden field to hold the parent cell’s current index.
Add a Hidden Input Field
- Add an Input element to the parent repeating group
- Set Initial content to: Current cell’s index
- Set Content format to: Integer
- Name it “Parent Cell Reference”
- In the Layout tab, check This element is visible on page load (unchecked)
- Check Collapse when hidden
This hidden field allows you to reference the parent cell number in calculations.
5. Configure Dynamic Data Source for Child Groups
Now comes the simple math that makes this setup work. We’ll use a custom formula to display the correct items in each child repeating group.
Set the Data Source with Calculations
For the child repeating group’s data source:
- Start with: Search for Products
- Add operator: items from #
- Use Arbitrary text with this formula:
- Parent Cell Reference’s value – 1 * 3 + 1:converted to number
- Add operator: items until #
- Use Arbitrary text with this formula:
- Parent Cell Reference’s value * 3:converted to number
These formulas ensure:
- Parent cell 1 shows items 1-3
- Parent cell 2 shows items 4-6
- Parent cell 3 shows items 7-9
- And so on…
Note: You may replace “3” in the formulas with your desired number of items per group.
6. Add the Ad Group
Create the group that will display your advertisements.
Create the Ad Container
- Add a Group element below the child repeating group (still within the parent)
- Name it “Group Ad”
- Set Type of content: Ads
- Set Data source: Search for Ads:item # Parent Cell Reference’s value
Style Your Ad Group
Configure the ad group’s appearance:
- Height: Fixed at 200px (or your preference)
- Margins: 20px on all sides
- Background style: Dynamic (reference Parent group’s Ads’s background color)
Add Ad Content
Within the ad group, add:
- Image element:
- Dynamic image: Parent group’s Ads’s image
- Fixed aspect ratio: 16:9
- Width: 300px max
- Text element:
- Dynamic text: Parent group’s Ads’s text
- Font size: 24px
- Color: White
- Button element:
- Text: “Sign Up Today” (or your CTA)
- Position below text
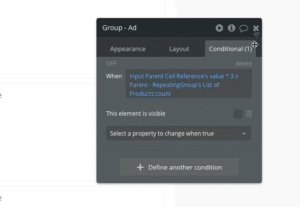
7. Handle Edge Cases
Prevent empty ad spaces when you have more parent cells than ads.
Add Visibility Conditions
On the Group Ad element, add a condition:
When: Parent Cell Reference’s value * 3 ≥ Parent Repeating Group’s List of Products:count
Property to change: This element is visible (unchecked)
This ensures ads only display when there are products to show alongside them.
Conclusion
With this guide, you’ve successfully implemented a repeating group with integrated ads! This technique opens up monetization opportunities for your Bubble application while maintaining a clean, professional feed layout.
If you’re interested in building robust applications in the Bubble editor, look into our complete guide on using reusable elements!