How to Setup Your Custom Database in Bubble
10th of September, 2024
In this guide, you’ll learn how to structure and create a custom database within Bubble. Creating a custom database from scratch can seem overwhelming, especially if you’re unfamiliar with similar tools. One of the most common questions on Bubble Database is about structuring data types and fields. This guide will focus on the strategy behind building a database from scratch, rather than just explaining which types and fields to create.
Throughout this guide you’ll learn:
I. Data Types and Fields in Bubble
II. Optimizing Database Performance
I. Data Types and Fields in Bubble
To begin, let’s look at the difference between data types and data fields. If you open the data tab within your Bubble Editor, you’ll notice that Bubble has already created a default data type: User. This is because most applications require users to register accounts.
A practical example: every user account stores specific data, such as an email and a password. The data type here is a User, and the data fields would be information about the user—like the email and password.
Creating a Database From Scratch
A frequent question is how to approach building a database from scratch. Many people find it difficult to distinguish between data types and data fields. This guide will walk you through an example of how to create a database from scratch and the thought process behind it.
Data types represent the core items you’ll be creating in your app. These can be things like accounts, posts, or comments. For example, a User is a data type, and the fields could include the user’s name, email, and password.
If you’re building a social media platform, a Post could be a data type, and its fields might include content (text or image) and the number of users who liked the post.
To explain database creation more clearly, we’ll walk through the process of creating a database for an Instagram clone.
Planning Your Database
I recommend using a tool like Notion to structure your database before entering it into Bubble. Here’s why: when creating a clone of Instagram, start by mapping out the core elements users will create, which will become your data types.
- User: This represents each account in the application.
- Post: This represents an Instagram post that appears in the homepage feed.
- Comment: This represents user comments on posts.
While you could add more types (e.g., stories), for now, we’ll focus on these three core data types.
Adding Data Fields
Once the data types are identified, the next step is to add the data fields within each type.
1. User Data Type Setup
For a User, the data fields might include:
- Name: The user’s name.
- Bio: A short description shown on the user’s profile.
- Handle: The user’s unique identifier (e.g., @username).
- Profile Photo: The user’s profile picture.
- Followers: A list of users who follow this account.
- Following: A list of users this account is following.
This structure outlines how the database will be built within the Bubble editor. You will have the data type (e.g., User) and all associated data fields (e.g., Name, Bio, Handle).
Within the User data type, fields are created to handle lists of followers and the users a person is following. These fields are lists of users, making it easy to manage followers within the database.
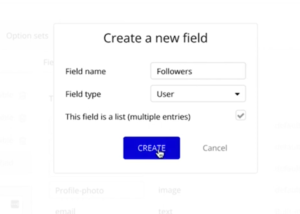
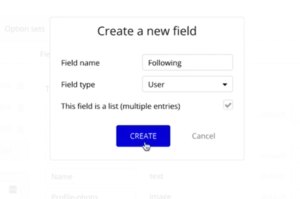
2.1 Post Data Type Setup
For each Post created by a user, you’ll store the following fields:
- Caption: The text content of the post.
- Likes: The users who liked the post.
You might wonder why we don’t create Likes as a separate data type, the way we do for Comments. In Bubble, Likes are stored as a list of users under the Post data type, using the User data field.
The database structure in Bubble is set up to handle user interactions like Likes on a post, by enabling the field to be a list with multiple entries. So, each time a user likes a post, they are added to a list of users. This allows for counting how many people have liked a post and retrieving their names and profile photos.
II. Optimizing Database Performance
Optimizing Performance for a Social Media App is very important to improve the user experience and reduce latency. We can optimize the database in Bubble by handling Post Images seperately. In our example of building an Instagram clone, the following steps will be helpful:
- The next step involves structuring the Post data type, particularly the handling of images.
- To optimize performance, especially when displaying a homepage feed, the image associated with each post is stored separately in a new Post-Content data type.
- This ensures that the Bubble application doesn’t load unnecessary images unless required, improving efficiency.
- Here, we will be splitting the Post Data Type into two parts: Post and Post-Content.
2.2 Post-Content Data Type Setup
The Post-Content data type includes the data fields:
- Image: the image associated with each post.
- Original-post: a reference to the original post.
This ensures that the post image is only loaded when necessary, preventing slow load times, particularly when displaying multiple posts at once.
So, for example, when an user scrolls the Instagram App, that may have 100’s of posts, we can set the app to load only 2 post images at once.
3. Comment Data Type Setup
A new Comment data type is created to store comments related to a post. For each Comment created by a user, you’ll store the following fields:
- Content: The text of the comment content
- Original-post: a reference to the original post. (Similar to the data field of Post-Content Data Type)
Each comment includes the content and is linked back to the original post. This is essential for retrieving comments when a user interacts with a post.
III. Building the Database in Bubble Editor
Once the data types and fields are defined, it is time to set them up in Bubble. It’s essential to link data types properly to ensure the correct functioning of workflows and app structure.
Naming Conventions in Bubble
- Avoiding Plurals: When creating a new data type, it’s important to avoid using plurals. For example, instead of naming a data type “Posts,” it should be named “Post.” This helps to avoid confusion since each data entry is handled one at a time.
- Organizing Data with Dash Separators: Using dashes between words in data types (e.g., “post-content”) helps maintain clarity when referencing data types in Bubble’s editor. This small detail ensures better organization and understanding of the database structure.
The outline of the overall database structure in Notion, can be helpful before implementing them in Bubble.
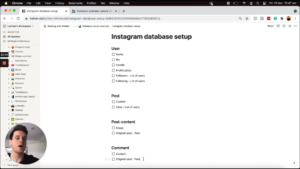
Setting up the User Data Type and Fields in Bubble
Starting with the User data type, the following fields are created:
- Name: A text field to store the user’s name (each user can have only one name).
- Bio: A text field for the user’s bio.
- Handle: A unique text field representing the user’s handle.
- Profile Photo: An image field for the user’s profile photo (each user has one profile photo at a time).
- Followers: A list of users that follow this user. This is a list with multiple entries.
- Following: A list of users that this user is currently following. This is also a list with multiple entries.

Once these fields are set up, they can be checked off in the Notion doc.
Setting up the Post Data Type and Fields in Bubble
- Caption: Each post will have a text field for the caption.
- Likes: This field will be a list of users who have liked the post. Since multiple users can like a post, this field will be set as a list with multiple entries.
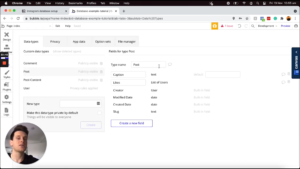
Setting up Post-Content Data Type and Fields in Bubble
- Image: The Post-Content data type will include an image field. By default, each post will have a single image. However, for applications supporting carousel posts with multiple images, this field could be set as a list of images.
- Original Post Link: A field called OG-post will be added to link the Post Content back to the original Post data type. This ensures that each Post-Content entry is associated with its respective post.


Optimizing Data Type Structure: To avoid loading excessive data and impacting performance, it is important to structure data types effectively. Linking a separate data type under an original data type may result in loading all associated data fields at once, which could slow down the application. Instead, link the second data type back to the first, ensuring that data is only loaded when necessary.
Setting Up Comment Data Type and Fields in Bubble
- Comment Content: This text field will store the content of each comment.
- Original Post Link: Each comment will be linked back to the original post it belongs to. This is done by setting the Original Post field as a post data type.

IV. Displaying Data on a Page
In Bubble, once all data types and fields are defined, the next step is to create a visual representation and functionality within the application. This involves setting up elements like repeating groups to display posts and associated content.
Displaying Posts in a Repeating Group
- Creating the Repeating Group: On the home page, add a repeating group to display a list of posts. Set the type of content for this repeating group to Post.
- Loading Posts: Perform a search to load all posts and set the repeating group to display these posts.
- Displaying Images: Since images are stored in a separate data type, dynamically retrieve and display the image for each post. Perform a search for Post Content where the original post matches the current post in the repeating group.
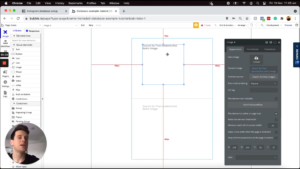
Linking Data Types: Linking data types and displaying them correctly ensures that only necessary information is loaded, optimizing performance. By performing a search for related data, the correct images and content will be displayed efficiently.
V. Conclusion
Creating a custom database in Bubble allows for a highly flexible and efficient way to manage data within an application. By following the outlined steps, you can build a robust database that supports various features and scales effectively.
For further tutorials and updates on using Bubble, consider subscribing to our newsletter to stay informed about the latest content and advancements in the no-code development space.


