


How to Build a Single-Page App in Bubble (2025 Complete Guide)
8th of May, 2025
Single-page applications (SPAs) offer a smoother, faster user experience compared to traditional multi-page applications. In this comprehensive guide, you’ll learn everything about building SPAs in Bubble.io, from understanding their benefits to implementing them step-by-step.
Throughout this guide you’ll learn how to:
Create the Basic Page Structure
Add a New Content Group to Your SPA
Create Option Sets For Navigation
Configure Navigation with URL Parameters
Create Conditional Display Logic
What Is A Single Page App?
Before diving into the development process, it’s important to understand what makes a single page application different from a traditional multi-page application:
- Single Page Apps: Load a single HTML page and dynamically update content as users interact with the app, without full page reloads
- Multi-Page Apps: Reload the entire page each time a user navigates to a different section
When comparing SPAs to multi-page apps, here’s some of the main factors to consider:
- Speed: SPAs offer faster navigation since only the necessary data is loaded.
- URL Structure: SPAs use URL parameters while maintaining the same base URL, whereas multi-page apps change the entire URL
- User Experience: SPAs provide a smoother, more app-like experience with quicker transitions
Advanced Features For Single Page Apps
When building single page apps, we can rely on several advanced features to put together a smooth and dynamic application.
- URL Parameters. These allow your app to quickly send data when the user interacts with the page.
- Option Sets. We can use a dropdown menu to maintain a consistent UX, avoid typos, and build an overall organized workflow.
- Reusable Elements. Can be used to save time, streamline formatting, and isolate workflows.
- Conditionals. With conditions, we can display content groups depending on the current URL parameters.
When To Use Single Page Apps
SPAs are ideal for most web applications. Consider using a single page app when:
- You want a modern, app-like experience
- Your application has related sections that users frequently navigate between
- Performance and speed are priorities
However, you might want to stick with multi-page apps when your application has completely different features and workflows on each page.
Create the Basic Page Structure
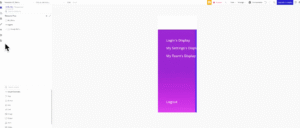
For a single page app, we need a layout that can accommodate different content sections while maintaining consistent navigation. Here’s how to set it up:
- Create a new page in Bubble that will serve as your single page app container.
- Divide the page into main sections:
- A header section (optionally as a reusable element)
- A menu section (as a reusable element)
- A main content section where different “pages” will be displayed
- In the main content section, you will need to create groups for each “page” you want to display:
- Each group should be named according to its function (e.g., “My Settings”, “Sign Up”)
- These groups will be shown or hidden based on URL parameters through the use of conditionals.
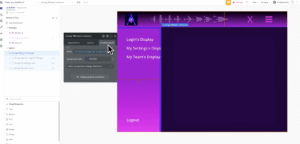
Our SPA’s menu is a reusable element containing multiple text elements which, when clicked by the user, lead to different views.
For now, let’s add a new text element which will lead to a new page in our SPA.
In this example, we’ll create a new text element in our menu with the text “SPECIAL PAGE #1”.
Add a New Content Group to Your SPA
Once you have the basic structure of your SPA set up, adding new content “pages” is straightforward.
Let’s create a simple example:
- In your main SPA page, add a new group element to the main content section.
- For this example, we’ll style the group with an orange background color and a text element with some basic placeholder text.
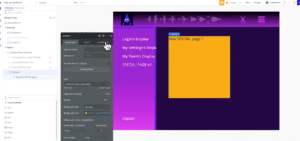
To set up the new page in our SPA, we’ll need to create a conditional for the group to only display when a specific URL parameter has a certain value.
To make this easier, we’ll proceed with creating a new option set.
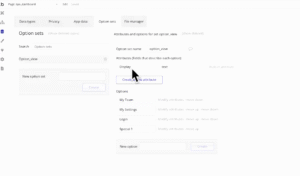
Create Option Sets For Navigation
Option sets help maintain consistency throughout your application by providing a structured way to reference values. Here’s how to create one for navigation:
- Go to the Data tab in Bubble
- Select Option Sets from the menu
- Create a new option set (e.g., “option_view”)
- Add options for each “page” in your app (e.g., “My Team”, “My Settings”, “Log In”). For our example, let’s create a new option labeled “Special 1”.
- Each option automatically has a “Display” attribute containing its text value.
- Optionally, add additional attributes to associate more data with each option. For example, you can give each option a numerical value.
Configure Navigation with URL Parameters
The core of a single page app is navigation that updates URL parameters rather than changing pages.
Here’s how to set this up using your reusable menu element:
- Open your menu reusable element
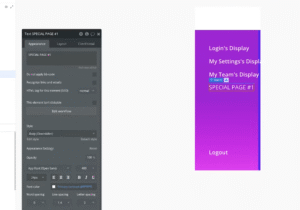
- Add a new text element for each new navigation option. In this case, we’ll create an element with the text “SPECIAL PAGE #1”.
- For each text element, add a new workflow:
- The trigger for the workflow should be “When clicked → Go to <SPA page>”. Note that the destination will always be the same page for each workflow.
- Click Add another parameter and add the parameter name to use for selecting the view (e.g., “param_view”).
- For the parameter value, select from your option set. To do this, click on the empty field and select Get an option.
- Select the option_view option set we prepared earlier and choose the “Special 1” option. We specifically want to retrieve that option’s Display attribute.
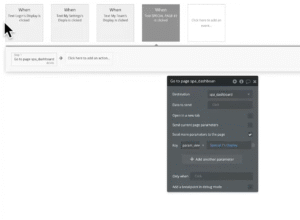
This setup ensures that when a user clicks a navigation option, the app stays on the same page but updates the URL parameters to indicate which content should be displayed.
Create Conditional Display Logic
Set Up Conditional Statements for Content Groups
Now we need to configure each content group to appear only when the corresponding URL parameter is present:
- Select each content group on the main SPA page
- Add a conditional statement:
- When: Get data from page URL → Parameter name (e.g., “param_view”)
- Value equals: Option set value (e.g., Option View → Login → Display)
- Then we’ll select the option to set this element to visible when the condition is met.
For each group, ensure these settings are set:
- Uncheck “This element is visible on page load” (except for your default view)
- Check “Collapse when hidden”
Convert Content Groups to Reusable Elements
For better organization and reusability, you can convert your content groups into reusable elements.
Let’s try to convert our new content group into a reusable element.
- Right-click on the content group in the Elements Tree panel.
- Select “Convert to a reusable element”
- Provide a new name for the reusable element.
When you convert a group to a reusable element, Bubble preserves any conditional statements within the group. However, you’ll need to add new conditional statements to control when the reusable element itself is displayed:
- Delete the original group
- Add the reusable element to your page
- Add a conditional statement to the reusable element:
- When: Get data from page URL → Parameter name
- Value equals: Corresponding option set value
- Then: This element is visible
- Ensure it’s not visible on page load and is collapsed when hidden
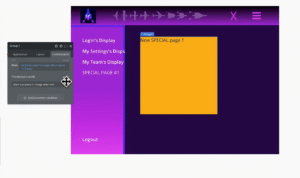
Test Your Single Page App
To verify your single page app is working correctly:
- Preview your application
- Click through your navigation options
- Observe that:
- The transitions are quick between views.
- The URL parameters change in the address bar
- Only the relevant content sections update
- Any dynamic elements (like titles and reusable elements) update accordingly
Conclusion
Building a single-page app in Bubble offers significant advantages in terms of user experience and performance. By leveraging URL parameters, option sets, conditional statements, and reusable elements, you can create a smooth, responsive application that feels more like a native app than a traditional website.
The techniques covered in this guide can be adapted to fit a wide range of applications. For even more helpful Bubble techniques, be sure to check out our guide on using reusable elements in Bubble!