


How to Use Backend Workflows in Bubble.io (Complete Guide)
24th of September, 2025
Backend workflows in Bubble allow you to process certain actions on the server side rather than the client side, improving user experience and security. This approach is particularly useful when you need to perform multiple non-critical tasks after a user action without making them wait.
In this guide, we’ll explore what backend workflows are, when to use them, and how to implement them in your Bubble application using a user signup example.
Throughout this guide you’ll learn how to:
Throughout this guide you’ll learn how to: 3 – Build the Backend Workflow Actions
1 – Backend Workflows Basics
What Are Backend Workflows?
Backend workflows are workflows that process on the Bubble server side, as opposed to regular workflows that process client side. This distinction creates several important advantages and considerations for your application.
Key Benefits:
- Improved user experience – Users don’t have to wait for non-critical processes to complete
- Enhanced security – Sensitive operations are processed server-side
Important Limitations:
- Asynchronous processing – Backend workflows won’t pull real-time data once initiated
When to Use Backend Workflows
Backend workflows are ideal for scenarios where you need to perform multiple tasks that aren’t critical to the user’s immediate experience. Common use cases include:
- Sending welcome emails after user registration
- Triggering business automation processes
- Adding users to Slack channels or sending notifications
- Processing large datasets or documents
2 – Set Up Backend Workflows
Enable Backend Workflows in Your Application
Before creating backend workflows, you need to enable them in your Bubble application:
- Navigate to Settings in your Bubble editor
- Go to the API tab
- Look for Enable Workflow API and backend workflows and click Activate
Note: You only need to enable workflow and backend workflows – you don’t need to enable the Data API for this functionality.
Create an API event for the Backend Workflow
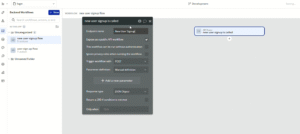
Let’s create a backend workflow for handling post-signup tasks:
- In the left menu, navigate to Backend workflows
- Click on the blue New button
- Create a new event and select General > API Workflow
- Set a new name for this endpoint. In this case, we’ll just name it New User Signup
- Uncheck the option Expose this as a public API workflow
- Add a parameter key called user with type User
This parameter will allow you to pass user data from your frontend workflow to the backend workflow.
3 – Build the Backend Workflow Actions
Add Email Functionality
Within your backend workflow, you can add various actions after the API event is triggered. For this example, we’ll send a welcome email:
- While in the same workflow as earlier, click on the plus symbol to add a new action
- Select the Send email action
- Configure the email settings:
- To: user → email
- Sender name: Enter your application name
- Subject and body: Add your welcome email content

You can continue adding more actions to your backend workflow, such as:
- API calls to external services
- Database operations
- Creating related data entries
- Sending notifications through various channels
The beauty of backend workflows is that all these actions will process without the user having to wait.
4 – Schedule Backend Workflows
Connect Frontend to Backend Workflow
To trigger your backend workflow from a regular workflow, you’ll use the Schedule API Workflow action:
- In your regular workflow (e.g., after Sign the user up)
- Add action Schedule API Workflow
- Select your backend workflow (e.g., “New User Sign up”)
- Set the user parameter to Current user
- Set the Scheduled date to Current date/time
One powerful feature of backend workflows is the ability to schedule them for future execution:
- Immediate execution: Use Current date/time
- Delayed execution: Add time operators like Current date/time plus minutes: 2 or Current date/time plus hours: 1
This is particularly useful for email sequences, reminder systems, or time-delayed automation.

Conclusion
Backend workflows are a powerful feature in Bubble that can significantly improve your application’s performance and user experience. By offloading non-critical tasks to server-side processing, you can create smoother user interactions while maintaining robust functionality behind the scenes.
For more Bubble tutorials on setting up workflows, check out our guide on building custom events in Bubble!