


How To Build an AI-Powered Tree Diagram Generator in Bubble.io
20th of January, 2026
Tree diagram generators powered by AI are becoming popular SaaS tools. In this guide, you’ll learn how to build your own using Bubble.io and OpenAI’s function calling feature—an essential skill for building AI-powered applications.
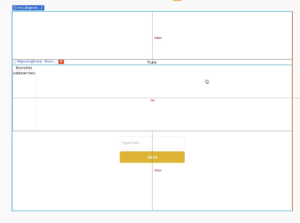
1. Build the User Interface
Your UI will consist of nested repeating groups that create the parent-child-grandchild relationships needed for tree diagrams.
Set Up the Tree Structure
- Create a new page and set Container alignment to Column with center alignment.
- Add a Repeating Group for the trunk with a Text element labeled “Trunk” inside.
- Set the repeating group to one row, one column, uncheck Set fixed number of rows, and set minimum width/height to 0.
- Add a second Repeating Group inside the first for branches—set to one row with unfixed columns.
- Add a third Repeating Group inside the branches for sub-branches with the same settings.
- Below the tree, add an Input element and a Button labeled “Send”.
2. Set Up the OpenAI API Integration
Configure the API Connector
- Install API Connector from Plugins.
- Add a new API named “OpenAI” with Private key in header authentication.
- Add a header: Key:
Content-Type| Value:application/json - Get your API key from OpenAI’s dashboard under API Keys.
- Enter your key as:
Bearer [YOUR_API_KEY]
Create the Tree Completion Call
- Add a call named “Tree Creation Completions”.
- Set to Action, method POST, endpoint:
https://api.openai.com/v1/chat/completions - Add this JSON body (the function calling schema tells OpenAI exactly what structure to return):
{
  "model": "gpt-3.5-turbo",
  "messages": [{"role": "user", "content": "<input>"}],
  "tools": [{
    "type": "function",
    "function": {
      "name": "generate_tree_diagram",
      "description": "Generate a tree diagram",
      "parameters": {
        "type": "object",
        "properties": {
          "trunk": {"type": "string", "description": "The main topic or name of the tree diagram"},
          "branches": {
            "type": "array",
            "items": {
              "type": "object",
              "properties": {
                "title": {"type": "string", "description": "Name or description of the branch"},
                "sub_branches": {"type": "array", "items": {"type": "string"}}
              }
            }
          }
        }
      }
    }
  }],
  "tool_choice": "required"
}
- Make
<input>dynamic, set type to text, uncheck Private, and initialize.
3. Create the Backend Workflow for JSON Processing
OpenAI returns tree data as a string. You need to convert it to a JSON object Bubble can use.
- Go to Backend workflows and create a new API workflow named “get_json”.
- Add a parameter “input” (type: text).
- Add action Return data from API with content type
application/jsonand data set to the input parameter.
Create the App API Call
- In API Connector, add a new API named “App” with a call named “Get JSON”.
- Get your Bubble API key from Settings > API and enter as:
Bearer [YOUR_BUBBLE_API_KEY] - Set method to POST, endpoint:
[Your Root URL]/api/1.1/wf/get_json - Body:
{"input": <input>}— make input dynamic and initialize.
4. Build the Workflow
Configure Data Types
- Set the trunk group’s Type of content to Get JSON.
- Set branches repeating group to Get JSON Branch.
- Set sub-branches repeating group to text.
Create the Button Workflow
- Add workflow to your Send button.
- Step 1: Add Plugins > OpenAI – Tree Creation Completions with input set to your input element’s value.
- Step 2: Add Plugins > App – Get JSON with input set to: Result of step 1’s choices’ tool_calls’ arguments:first item:format as JSON-safe
- Step 3: Add Display data in group targeting your tree group with data source Result of step 2.
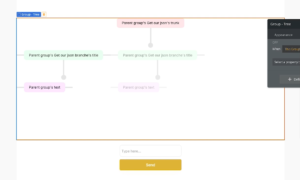
Connect Data Sources
- Trunk text:
Parent group's Get JSON's trunk - Branches data source:
Parent group's Get JSON's branches - Branches text:
Current cell's Get JSON Branch's title - Sub-branches data source:
Parent group's Get JSON Branch's sub_branches - Sub-branches text:
Current cell's text
5. Style the Tree Diagram
Style the Nodes
For each level (trunk, branches, sub-branches):
- Group the text element in a row/column.
- Set minimum width/height to 0.
- Add padding: 10px top/bottom, 20px left/right.
- Add a flat background color with 10% opacity (use different colors per level).
- Set roundness to 10.
Add Connecting Lines
- Add vertical Shape elements (5px wide, 60px tall) between levels.
- Add circular nodes (20px × 20px, 100% roundness).
- Add horizontal connectors (30px wide, 5px tall) between sibling nodes.
Handle Edge Cases
Add conditionals to hide connectors on first/last items:
- First item: When current cell’s index is 1, set connector opacity to 0.
- Last item: When the current item matches the list’s last item, set connector opacity to 0.
Final Touches
- Set repeating group Separators and Borders to None.
- On the tree group, uncheck visible on page load, enable Collapse when hidden.
- Add conditional: When trunk is not empty → This element is visible.
Conclusion
You’ve built an AI-powered tree diagram generator using Bubble.io and OpenAI’s function calling. This technique—defining structured output schemas for AI responses—is foundational for building AI-powered applications and can be adapted for mind maps, org charts, or flowcharts.
For more Bubble tutorials on improving user experience, check out our guide on building overlapping repeating groups in Bubble!